(() => {
  // node_modules/aws4fetch/dist/aws4fetch.esm.mjs
  var encoder = new TextEncoder();
  var HOST_SERVICES = {
    appstream2: 'appstream',
    cloudhsmv2: 'cloudhsm',
    email: 'ses',
    marketplace: 'aws-marketplace',
    mobile: 'AWSMobileHubService',
    pinpoint: 'mobiletargeting',
    queue: 'sqs',
    'git-codecommit': 'codecommit',
    'mturk-requester-sandbox': 'mturk-requester',
    'personalize-runtime': 'personalize',
  };
  var UNSIGNABLE_HEADERS = /* @__PURE__ */ new Set([
    'authorization',
    'content-type',
    'content-length',
    'user-agent',
    'presigned-expires',
    'expect',
    'x-amzn-trace-id',
    'range',
    'connection',
  ]);
  var AwsClient = class {
    constructor({
      accessKeyId,
      secretAccessKey,
      sessionToken,
      service,
      region,
      cache,
      retries,
      initRetryMs,
    }) {
      if (accessKeyId == null)
        throw new TypeError('accessKeyId is a required option');
      if (secretAccessKey == null)
        throw new TypeError('secretAccessKey is a required option');
      this.accessKeyId = accessKeyId;
      this.secretAccessKey = secretAccessKey;
      this.sessionToken = sessionToken;
      this.service = service;
      this.region = region;
      this.cache = cache || /* @__PURE__ */ new Map();
      this.retries = retries != null ? retries : 10;
      this.initRetryMs = initRetryMs || 50;
    }
    async sign(input, init) {
      if (input instanceof Request) {
        const { method, url, headers, body } = input;
        init = Object.assign({ method, url, headers }, init);
        if (init.body == null && headers.has('Content-Type')) {
          init.body =
            body != null && headers.has('X-Amz-Content-Sha256')
              ? body
              : await input.clone().arrayBuffer();
        }
        input = url;
      }
      const signer = new AwsV4Signer(
        Object.assign({ url: input }, init, this, init && init.aws)
      );
      const signed = Object.assign({}, init, await signer.sign());
      delete signed.aws;
      try {
        return new Request(signed.url.toString(), signed);
      } catch (e) {
        if (e instanceof TypeError) {
          return new Request(
            signed.url.toString(),
            Object.assign({ duplex: 'half' }, signed)
          );
        }
        throw e;
      }
    }
    async fetch(input, init) {
      for (let i = 0; i <= this.retries; i++) {
        const fetched = fetch(await this.sign(input, init));
        if (i === this.retries) {
          return fetched;
        }
        const res = await fetched;
        if (res.status < 500 && res.status !== 429) {
          return res;
        }
        await new Promise((resolve) =>
          setTimeout(resolve, Math.random() * this.initRetryMs * Math.pow(2, i))
        );
      }
      throw new Error(
        'An unknown error occurred, ensure retries is not negative'
      );
    }
  };
  var AwsV4Signer = class {
    constructor({
      method,
      url,
      headers,
      body,
      accessKeyId,
      secretAccessKey,
      sessionToken,
      service,
      region,
      cache,
      datetime,
      signQuery,
      appendSessionToken,
      allHeaders,
      singleEncode,
    }) {
      if (url == null) throw new TypeError('url is a required option');
      if (accessKeyId == null)
        throw new TypeError('accessKeyId is a required option');
      if (secretAccessKey == null)
        throw new TypeError('secretAccessKey is a required option');
      this.method = method || (body ? 'POST' : 'GET');
      this.url = new URL(url);
      this.headers = new Headers(headers || {});
      this.body = body;
      this.accessKeyId = accessKeyId;
      this.secretAccessKey = secretAccessKey;
      this.sessionToken = sessionToken;
      let guessedService, guessedRegion;
      if (!service || !region) {
        [guessedService, guessedRegion] = guessServiceRegion(
          this.url,
          this.headers
        );
      }
      this.service = service || guessedService || '';
      this.region = region || guessedRegion || 'us-east-1';
      this.cache = cache || /* @__PURE__ */ new Map();
      this.datetime =
        datetime || new Date().toISOString().replace(/[:-]|\.\d{3}/g, '');
      this.signQuery = signQuery;
      this.appendSessionToken =
        appendSessionToken || this.service === 'iotdevicegateway';
      this.headers.delete('Host');
      if (
        this.service === 's3' &&
        !this.signQuery &&
        !this.headers.has('X-Amz-Content-Sha256')
      ) {
        this.headers.set('X-Amz-Content-Sha256', 'UNSIGNED-PAYLOAD');
      }
      const params = this.signQuery ? this.url.searchParams : this.headers;
      params.set('X-Amz-Date', this.datetime);
      if (this.sessionToken && !this.appendSessionToken) {
        params.set('X-Amz-Security-Token', this.sessionToken);
      }
      this.signableHeaders = ['host', ...this.headers.keys()]
        .filter((header) => allHeaders || !UNSIGNABLE_HEADERS.has(header))
        .sort();
      this.signedHeaders = this.signableHeaders.join(';');
      this.canonicalHeaders = this.signableHeaders
        .map(
          (header) =>
            header +
            ':' +
            (header === 'host'
              ? this.url.host
              : (this.headers.get(header) || '').replace(/\s+/g, ' '))
        )
        .join('\n');
      this.credentialString = [
        this.datetime.slice(0, 8),
        this.region,
        this.service,
        'aws4_request',
      ].join('/');
      if (this.signQuery) {
        if (this.service === 's3' && !params.has('X-Amz-Expires')) {
          params.set('X-Amz-Expires', '86400');
        }
        params.set('X-Amz-Algorithm', 'AWS4-HMAC-SHA256');
        params.set(
          'X-Amz-Credential',
          this.accessKeyId + '/' + this.credentialString
        );
        params.set('X-Amz-SignedHeaders', this.signedHeaders);
      }
      if (this.service === 's3') {
        try {
          this.encodedPath = decodeURIComponent(
            this.url.pathname.replace(/\+/g, ' ')
          );
        } catch (e) {
          this.encodedPath = this.url.pathname;
        }
      } else {
        this.encodedPath = this.url.pathname.replace(/\/+/g, '/');
      }
      if (!singleEncode) {
        this.encodedPath = encodeURIComponent(this.encodedPath).replace(
          /%2F/g,
          '/'
        );
      }
      this.encodedPath = encodeRfc3986(this.encodedPath);
      const seenKeys = /* @__PURE__ */ new Set();
      this.encodedSearch = [...this.url.searchParams]
        .filter(([k]) => {
          if (!k) return false;
          if (this.service === 's3') {
            if (seenKeys.has(k)) return false;
            seenKeys.add(k);
          }
          return true;
        })
        .map((pair) => pair.map((p) => encodeRfc3986(encodeURIComponent(p))))
        .sort(([k1, v1], [k2, v2]) =>
          k1 < k2 ? -1 : k1 > k2 ? 1 : v1 < v2 ? -1 : v1 > v2 ? 1 : 0
        )
        .map((pair) => pair.join('='))
        .join('&');
    }
    async sign() {
      if (this.signQuery) {
        this.url.searchParams.set('X-Amz-Signature', await this.signature());
        if (this.sessionToken && this.appendSessionToken) {
          this.url.searchParams.set('X-Amz-Security-Token', this.sessionToken);
        }
      } else {
        this.headers.set('Authorization', await this.authHeader());
      }
      return {
        method: this.method,
        url: this.url,
        headers: this.headers,
        body: this.body,
      };
    }
    async authHeader() {
      return [
        'AWS4-HMAC-SHA256 Credential=' +
          this.accessKeyId +
          '/' +
          this.credentialString,
        'SignedHeaders=' + this.signedHeaders,
        'Signature=' + (await this.signature()),
      ].join(', ');
    }
    async signature() {
      const date = this.datetime.slice(0, 8);
      const cacheKey = [
        this.secretAccessKey,
        date,
        this.region,
        this.service,
      ].join();
      let kCredentials = this.cache.get(cacheKey);
      if (!kCredentials) {
        const kDate = await hmac('AWS4' + this.secretAccessKey, date);
        const kRegion = await hmac(kDate, this.region);
        const kService = await hmac(kRegion, this.service);
        kCredentials = await hmac(kService, 'aws4_request');
        this.cache.set(cacheKey, kCredentials);
      }
      return buf2hex(await hmac(kCredentials, await this.stringToSign()));
    }
    async stringToSign() {
      return [
        'AWS4-HMAC-SHA256',
        this.datetime,
        this.credentialString,
        buf2hex(await hash(await this.canonicalString())),
      ].join('\n');
    }
    async canonicalString() {
      return [
        this.method.toUpperCase(),
        this.encodedPath,
        this.encodedSearch,
        this.canonicalHeaders + '\n',
        this.signedHeaders,
        await this.hexBodyHash(),
      ].join('\n');
    }
    async hexBodyHash() {
      let hashHeader =
        this.headers.get('X-Amz-Content-Sha256') ||
        (this.service === 's3' && this.signQuery ? 'UNSIGNED-PAYLOAD' : null);
      if (hashHeader == null) {
        if (
          this.body &&
          typeof this.body !== 'string' &&
          !('byteLength' in this.body)
        ) {
          throw new Error(
            'body must be a string, ArrayBuffer or ArrayBufferView, unless you include the X-Amz-Content-Sha256 header'
          );
        }
        hashHeader = buf2hex(await hash(this.body || ''));
      }
      return hashHeader;
    }
  };
  async function hmac(key, string) {
    const cryptoKey = await crypto.subtle.importKey(
      'raw',
      typeof key === 'string' ? encoder.encode(key) : key,
      { name: 'HMAC', hash: { name: 'SHA-256' } },
      false,
      ['sign']
    );
    return crypto.subtle.sign('HMAC', cryptoKey, encoder.encode(string));
  }
  async function hash(content) {
    return crypto.subtle.digest(
      'SHA-256',
      typeof content === 'string' ? encoder.encode(content) : content
    );
  }
  function buf2hex(buffer) {
    return Array.prototype.map
      .call(new Uint8Array(buffer), (x) => ('0' + x.toString(16)).slice(-2))
      .join('');
  }
  function encodeRfc3986(urlEncodedStr) {
    return urlEncodedStr.replace(
      /[!'()*]/g,
      (c) => '%' + c.charCodeAt(0).toString(16).toUpperCase()
    );
  }
  function guessServiceRegion(url, headers) {
    const { hostname, pathname } = url;
    if (hostname.endsWith('.r2.cloudflarestorage.com')) {
      return ['s3', 'auto'];
    }
    if (hostname.endsWith('.backblazeb2.com')) {
      const match2 = hostname.match(
        /^(?:[^.]+\.)?s3\.([^.]+)\.backblazeb2\.com$/
      );
      return match2 != null ? ['s3', match2[1]] : ['', ''];
    }
    const match = hostname
      .replace('dualstack.', '')
      .match(/([^.]+)\.(?:([^.]*)\.)?amazonaws\.com(?:\.cn)?$/);
    let [service, region] = (match || ['', '']).slice(1, 3);
    if (region === 'us-gov') {
      region = 'us-gov-west-1';
    } else if (region === 's3' || region === 's3-accelerate') {
      region = 'us-east-1';
      service = 's3';
    } else if (service === 'iot') {
      if (hostname.startsWith('iot.')) {
        service = 'execute-api';
      } else if (hostname.startsWith('data.jobs.iot.')) {
        service = 'iot-jobs-data';
      } else {
        service = pathname === '/mqtt' ? 'iotdevicegateway' : 'iotdata';
      }
    } else if (service === 'autoscaling') {
      const targetPrefix = (headers.get('X-Amz-Target') || '').split('.')[0];
      if (targetPrefix === 'AnyScaleFrontendService') {
        service = 'application-autoscaling';
      } else if (targetPrefix === 'AnyScaleScalingPlannerFrontendService') {
        service = 'autoscaling-plans';
      }
    } else if (region == null && service.startsWith('s3-')) {
      region = service.slice(3).replace(/^fips-|^external-1/, '');
      service = 's3';
    } else if (service.endsWith('-fips')) {
      service = service.slice(0, -5);
    } else if (region && /-\d$/.test(service) && !/-\d$/.test(region)) {
      [service, region] = [region, service];
    }
    return [HOST_SERVICES[service] || service, region];
  }

  // index.js
  var UNSIGNABLE_HEADERS2 = ['x-forwarded-proto', 'x-real-ip'];
  function filterHeaders(headers) {
    return Array.from(headers.entries()).filter(
      (pair) =>
        !UNSIGNABLE_HEADERS2.includes(pair[0]) && !pair[0].startsWith('cf-')
    );
  }
  async function handleRequest(event, client2) {
    const request = event.request;
    if (!['GET', 'HEAD'].includes(request.method)) {
      return new Response(null, {
        status: 405,
        statusText: 'Method Not Allowed',
      });
    }
    const url = new URL(request.url);
    let path = url.pathname.replace(/^\//, '');
    path = path.replace(/\/$/, '');
    const pathSegments = path.split('/');
    if (ALLOW_LIST_BUCKET !== 'true') {
      if (
        (BUCKET_NAME === '$path' && pathSegments[0].length < 2) ||
        (BUCKET_NAME !== '$path' && path.length === 0)
      ) {
        return new Response(null, {
          status: 404,
          statusText: 'Not Found',
        });
      }
    }
    switch (BUCKET_NAME) {
      case '$path':
        url.hostname = B2_ENDPOINT;
        break;
        break;
      case '$host':
        url.hostname = url.hostname.split('.')[0] + '.' + B2_ENDPOINT;
        break;
      default:
        url.hostname = BUCKET_NAME + '.' + B2_ENDPOINT;
        break;
    }
    const headers = filterHeaders(request.headers);
    const signedRequest = await client2.sign(url.toString(), {
      method: request.method,
      headers,
      body: request.body,
    });
    return fetch(signedRequest);
  }
  var endpointRegex = /^s3\.([a-zA-Z0-9-]+)\.backblazeb2\.com$/;
  var [, aws_region] = B2_ENDPOINT.match(endpointRegex);
  var client = new AwsClient({
    accessKeyId: B2_APPLICATION_KEY_ID,
    secretAccessKey: B2_APPLICATION_KEY,
    service: 's3',
    region: aws_region,
  });
  addEventListener('fetch', function (event) {
    event.respondWith(handleRequest(event, client));
  });
})();

 Previous articleBackup
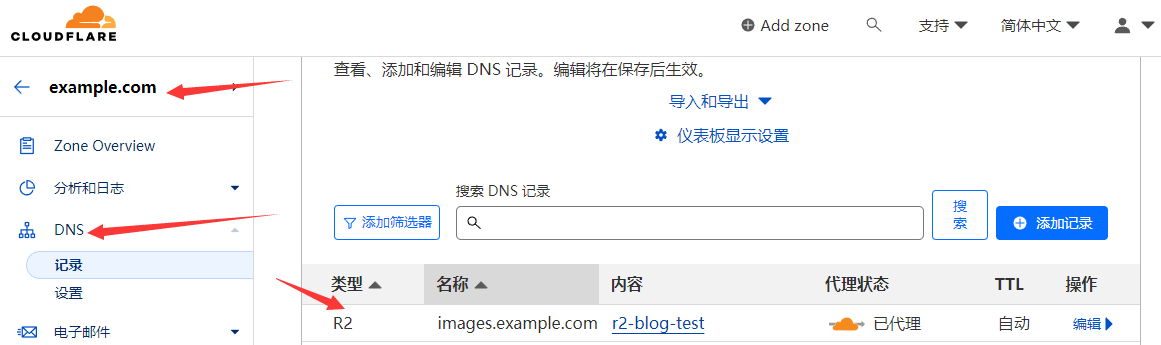
 Then the domain name’s DNS will automatically appear with a resolution:
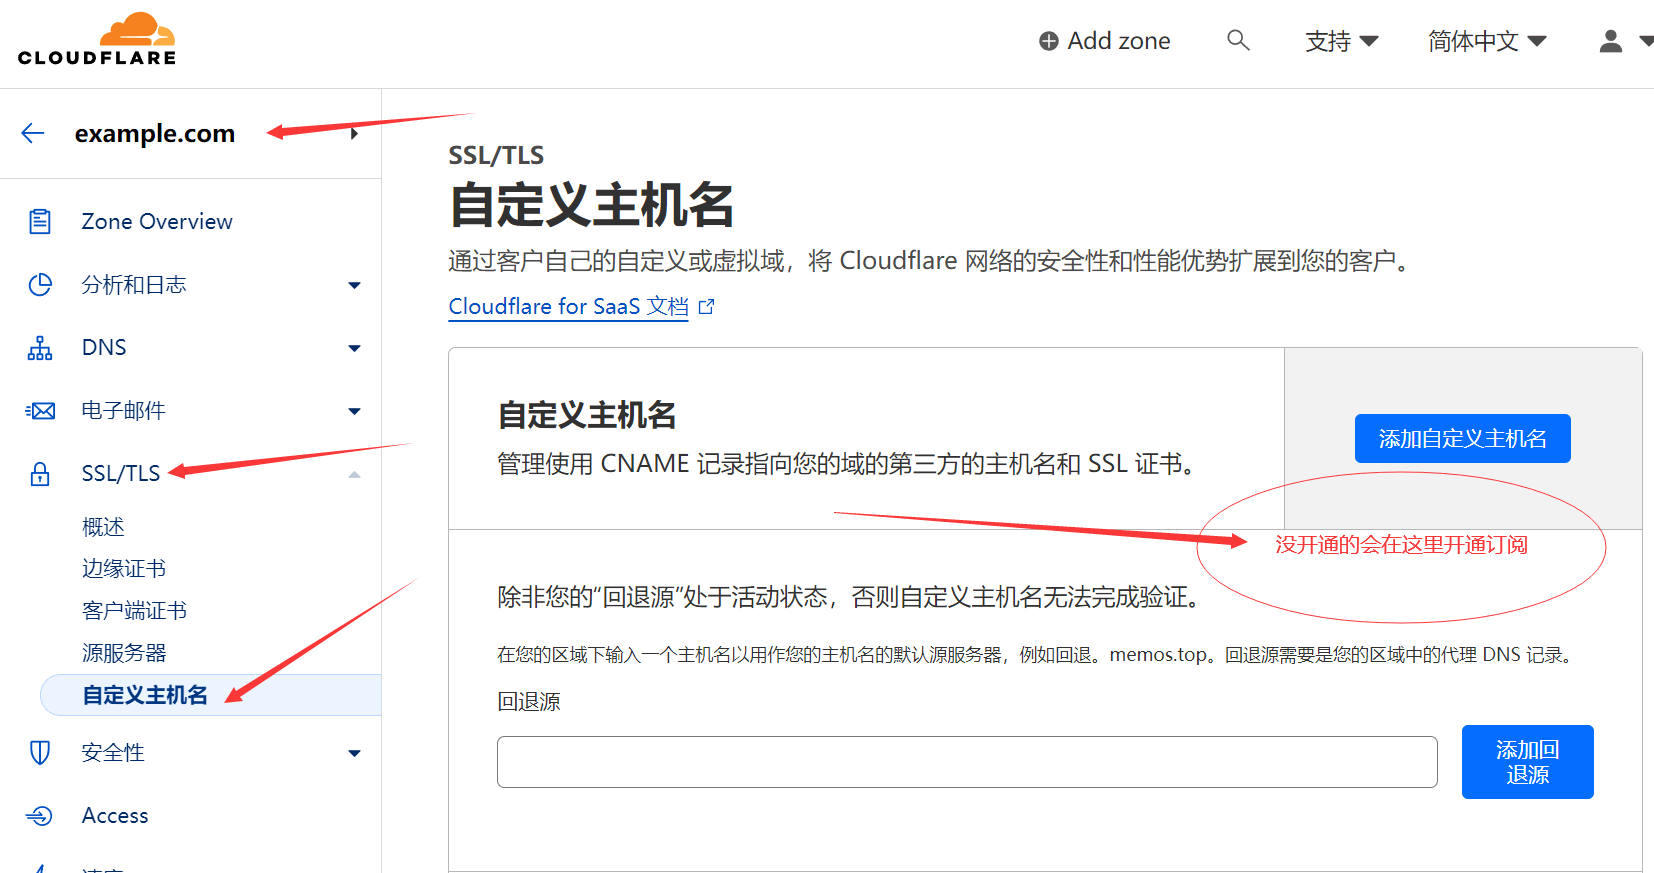
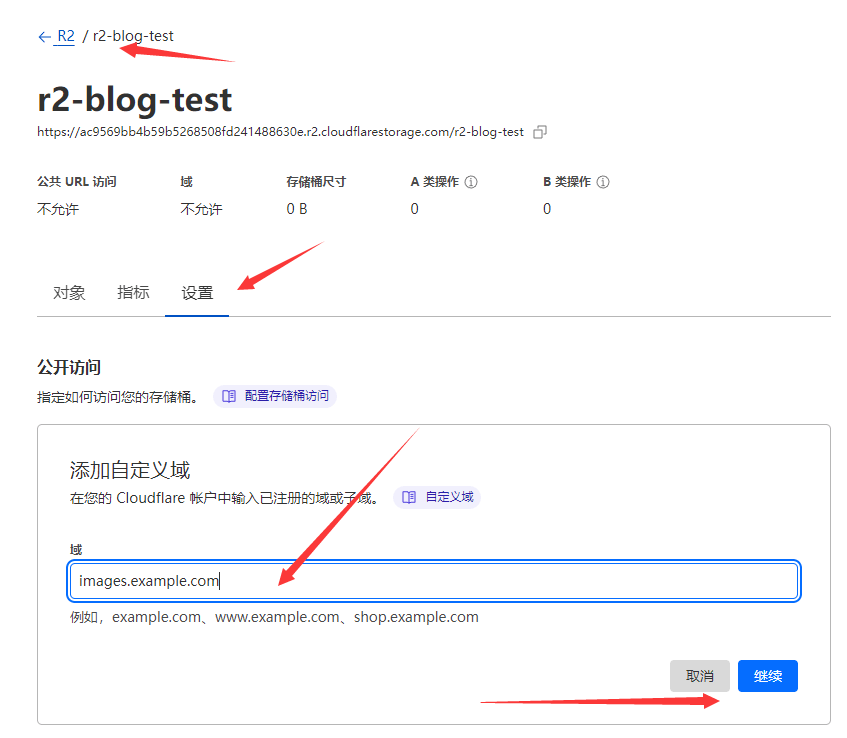
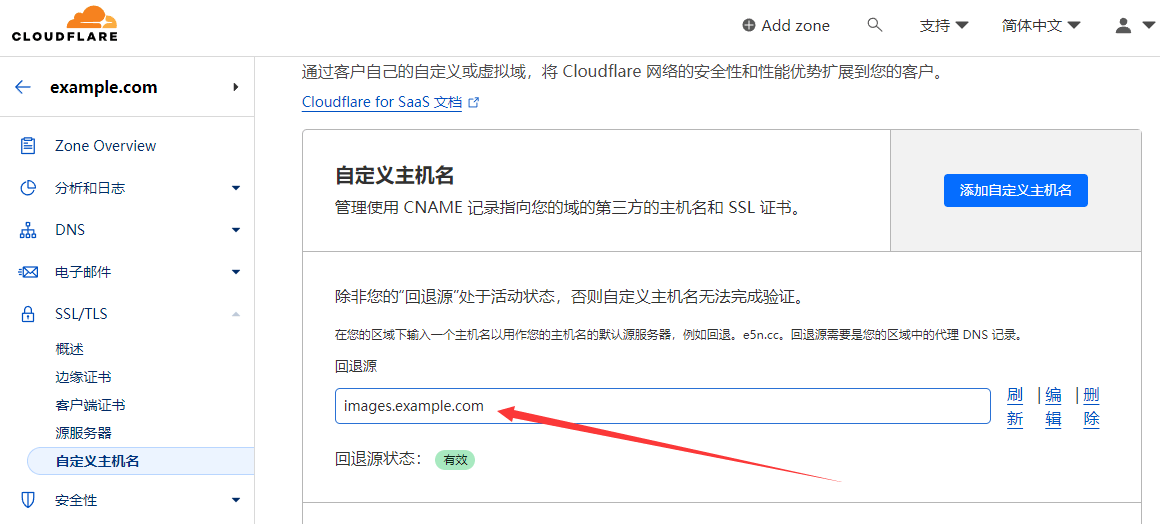 Then click
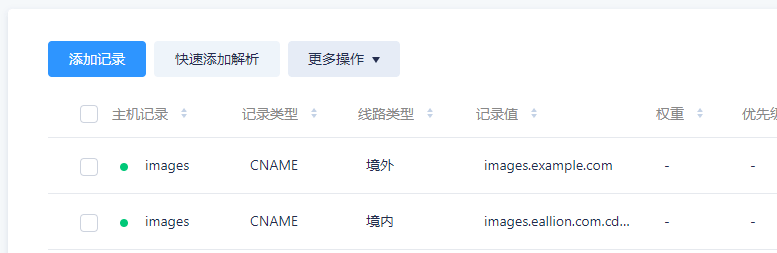
 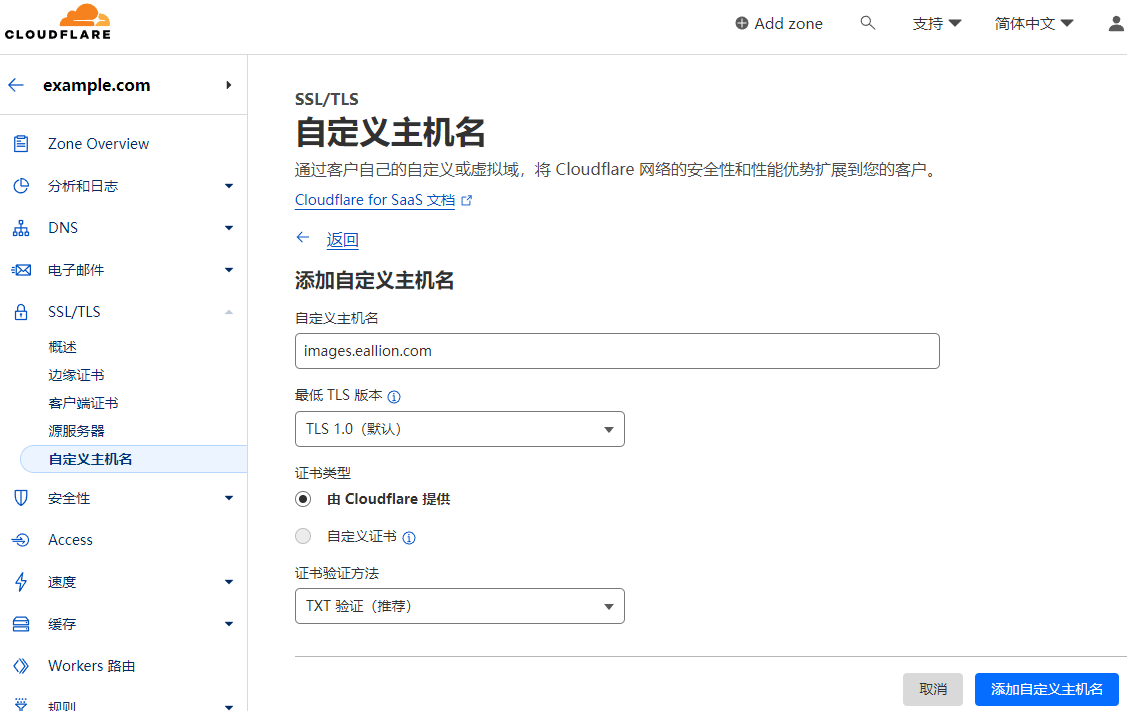 After adding, you need to validate the domain name. Go to your own domain name resolution console, such as DNSPod, and add 2 TXT records.
Wait for both
After adding, you need to validate the domain name. Go to your own domain name resolution console, such as DNSPod, and add 2 TXT records.
Wait for both 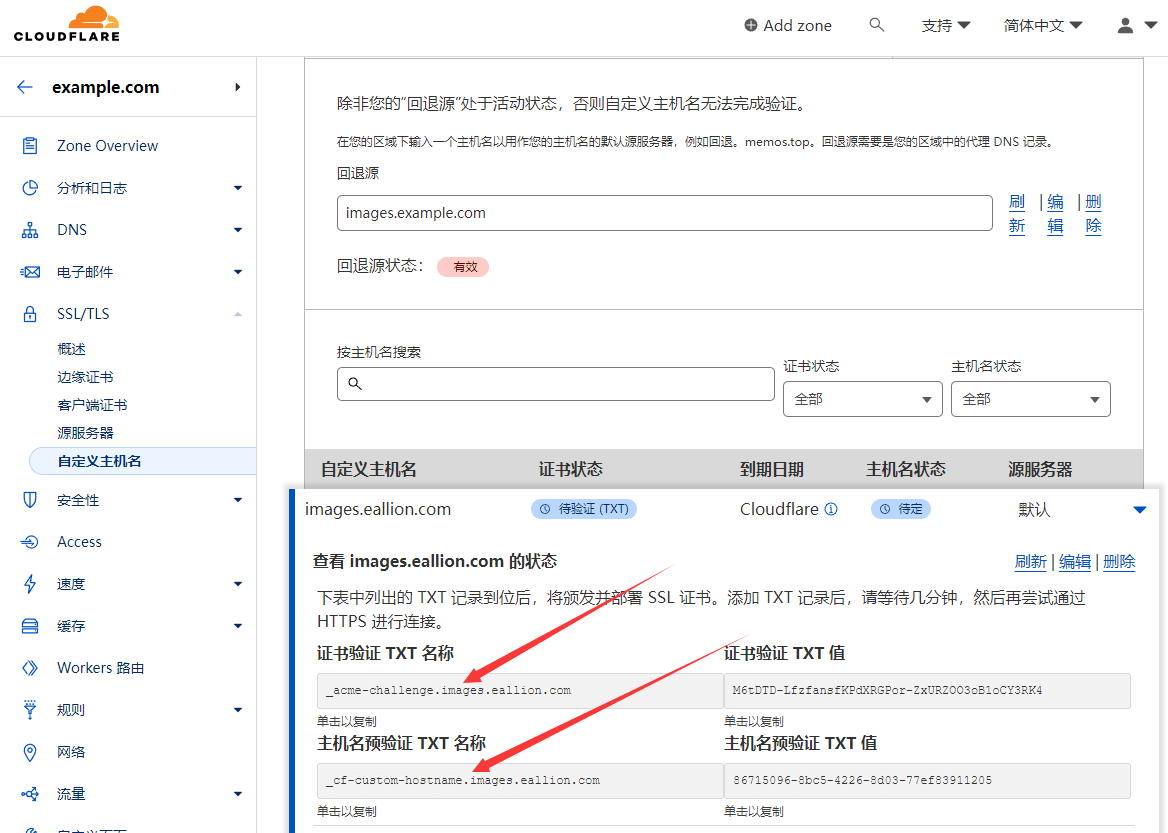
 Normally’s tutorial ends here.
But this way isVisit doesn’t work with R2’s resources.
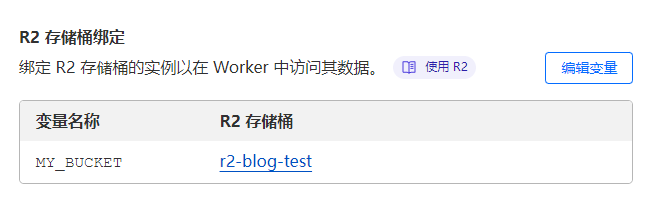
The most important step, use Worker Proxy R2.
Normally’s tutorial ends here.
But this way isVisit doesn’t work with R2’s resources.
The most important step, use Worker Proxy R2.
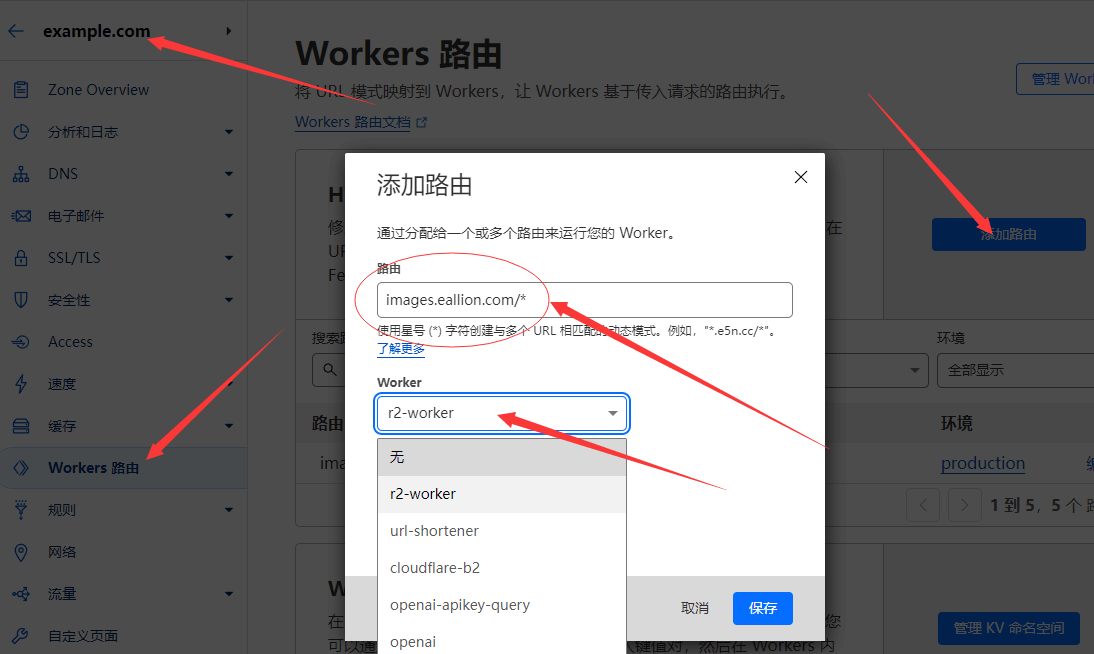 At this point, you should be able to visit Cloudflare R2’s content using CNAME’s method.